Moving Between WordPress.com Blogs
If you already own the blog, please follow these steps:
- Log into the old blog, go to Tools → Export, and download the XML (WXR) file to your computer.
- In the new blog, go to Tools → Import → WordPress, and upload the file you downloaded in step 1. After you upload the file, you can choose the option to Download & import file attachments if you want to move your media files.
Moving from WordPress.org
If you are moving from a self-hosted blog using the WordPress.org software, you can move your blog to our WordPress.com service with the following steps:
- Register a WordPress.com account and blog athttp://wordpress.com/signup/
- In the old blog, go to Tools → Export and download the XML (WXR) file to your computer.
- In the new blog (on WordPress.com), go to Tools → Import → WordPress and upload the file you downloaded in step 2. After you upload the file, you can choose the option to Download & import file attachments if you want to move your media files.
Moving to WordPress.org
Guided Transfers
If you want to move your WordPress.com blog to a self-hosted blog using the WordPress.org software, you have the option to purchase a
Guided Transfer. One of our Happiness Engineers will transfer over all your content, install and configure plugins to support features you have used on WordPress.com, switch your domain(s) over, and provide support on your new WordPress.org install for a two-week period.
If you are moving to a self-hosted blog using the
WordPress.org software, you first need to obtain appropriate web hosting and have your WordPress.org blog/site up and running before transferring your content.
WordPress.org Hosting
The content transfer process is similar to that described above (between WordPress.com blogs):
- In the old blog, go to Tools → Export and download the XML (WXR) file to your computer.
- In the new blog, go to Tools → Import → WordPress and upload the file you downloaded in step 1. Make sure that you choose the option to Download & import file attachments. This option will be available after you upload the file.
Note that the above assumes that you are using the latest version of the WordPress software. If you are having troubles getting your WordPress.org installation up and running, please refer to the
appropriate forums.
Videos uploaded to WordPress.com cannot be moved through the import process. However, you can continue to use the existing videos through
VideoPress plugin, which provides an easy way to manage and embed videos hosted on the WordPress.com service.
Transferring Your Blog to Another User or Account
To transfer a blog, go to
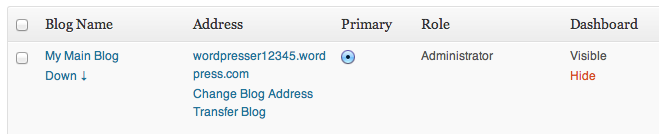
My Blogs in your dashboard:
Note that this will take you to a different screen than the My Blogs tab on the WordPress.com homepage. You cannot transfer a blog from the My Blogs section of the homepage.
On the My Blogs screen, move your mouse over the address of the blog you wish to transfer, and you will see that a Transfer Blog option appears beneath the blog address:
Note that you will only see this for blogs where you are the owner.
If you are certain you want to transfer a blog then click the transfer blog option. A screen will appear with a warning:
After you have read and confirmed this warning, you can enter the username or email address of the WordPress.com user you wish to transfer the blog to:
After entering a valid user information, you will receive a confirmation email to your registered WordPress.com email address. Your blog transfer will not take place until you read this email and follow the link contained within it.
- If you wish to transfer a blog to a user who does NOT yet have an account, please have them register first at http://wordpress.com/signup/.
- A blog with domain upgrades will be processed manually by a member of WordPress.com support. All other upgrades will be transferred with the blog. Please be aware of this before you transfer your blog.
Here’s a video that walks you through the transfer process:
WordPress.com: Transferring A Blog