CATEGORY

see also

Infolinks In Text Ads

Search This Blog

How to detect that a keylogger is installed on a computer or not


anti keyloggersKey loggers are software that traces the key strokes on your computer. It is done in such a way that a person using the computer is unaware of the fact that a key logger is installed on a particular PC.

How does  keyloggers enters your computer ?

There are several ways in which a key logger can get into your computer either it is directly installed or it is indirectly transferred to your computer. Most of the time, this malicious file enters a computer when the user downloads an infected application like movies, music or other software applications.

So how to get rid of  keyloggers that is installed on a computer

1. Use updated antivirus and anti spyware
Some of the good anti viruses have capability to detect key loggers. So you should update your antiviruses regularly so that it gets updated for new keyloggers.
2. Use Anti keyloggers
There are anti keyloggers available that will make the task easy for you in finding a keyloggers. Use these softwares if you think there is a high possibility of keyloggers on a computer. The anti keyloggers that i will suggest you is Cyberhawk. Even  Kasperky does a good job in this area too. Also check anti-spy.info. More examples:
3. Search for keyloggers yourself
Keyloggers have the capability that they hide them self from the user but are active in the background. There are some shortcuts that are used to see them live on screen
For example : Ctrl + Alt + X or Ctrl + Alt + Wondows Key + X or desktopshark  etc.
4. Use special tools
KL-Detector
Freeware on demand keylogger scanner.
SnoopFree
Freeware antikeylogger that block hook based keyloggers as well as screen captures. For Windows XP.
PSMAntiKeyLogger
PSMAntiKeyLogger is a real-time protecting software which protects you against Keyloggers. No scanning is needed.
I Hate Keyloggers
Freeware antikeylogger that block hook based keyloggers. For Windows 2000 and XP.
UBUNTU: HOW TO INSTALL AND RUN LINUX FROM YOUR USB FLASH

What do you use your USB flash drive for? Have you considered running Linux from it? ALinux Live USB flash drive is a great way to try out Linux without making any changes to your computer. It's also handy to have around in case Windows won't boot--allowing access to your hard disks--or if you just want to run a system memory test.

Install Ubuntu onto USB flash drive

There are a lot of Linux distros to choose from, but in our example, we are going to install Ubuntu using a Windows machine. Your USB flash drive should be at least 1GB in size.

Step 1: Download the 32-bit ISO of Ubuntu 11.04 Desktop and the Universal USB Installer. The ISO file is named ubuntu-11.04-desktop-i386.iso and the Universal USB installer is named Universal-USB-Installer-1.8.5.6.exe.

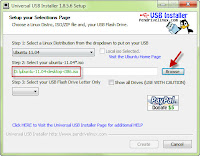
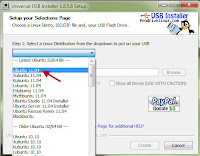
Step 2: Double-click on Universal-USB-Installer-1.8.5.6.exe and after accepting the license agreement, select Ubuntu 11.04 from the drop-down list. 

Ubuntu-onto-USB-flash-drive

Step 3: Browse and select the Ubuntu 11.04 ISO file you just downloaded.

Ubuntu-onto-USB-flash-drive

Step 4: Select the drive letter of the USB flash drive you want to put Ubuntu onto and check the box to format the USB flash drive. Make sure persistent file size is set to 0MB, then click the Create button.

Ubuntu-onto-USB-flash-drive

Step 5: Confirm the details of the install then click the Yes button.

Ubuntu-onto-USB-flash-drive

Run Ubuntu Live

Step 1: Make sure that your computer's BIOS is set to boot from USB devices then insert the USB flash drive into a USB 2.0 port. Turn your computer on and watch it boot to the installer boot menu.

Step 2: At the installer boot menu, select "Run Ubuntu from this USB."

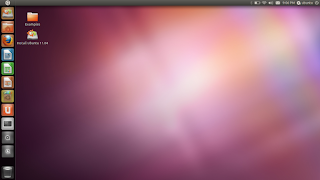
Step 3: You'll see Ubuntu start up and eventually get the Ubuntu desktop. From here, you can configure your Wi-Fi and use the included Firefox browser to access the Internet.

Ubuntu-onto-USB-flash-drive

There you have it. Now you know how to set up your USB flash drive to run Linux. Keep in mind that any changes you make while running Linux Live will not be saved. If you like what you see and want to run the full-blown version of Ubuntu, you can use the USB flash drive to install it onto your computer. Good luck and have fun!

imTOO HD video converter v 7.3.0. build. 20120529

ccleaner-professional-3.20.1750-full

ram-saver-professional-12.1-full-version.

download it with keygen from here
click here

DOWNLOAD WINDOWS LOADER 2.1.5

How-to-Enable-Right-Click-on-Any-Webpage


Follow These Simple Steps to Right Click

  1. Click on [Favorites] on the top of the browser.
  2. Click on [Add to Favorites...].
  3. When Add Favorite box pops up, enter a name that you can easily remember later such as Right Click. Then click [ok].
  4. Click on [Favorites].
  5. Find the Right Click button you just created, then right click on it. Then click [Properties].
  6. On the Web Document tab, copy and paste the following code:
    javascript:function r(d){d.oncontextmenu=null;d.onselectstart=null;d.ondragstart=null;d.onkeydown=null;d.onmousedown=null; d.body.oncontextmenu=null;d.body.onselectstart=null;d.body.ondragstart=null;d.body.onkeydown=null; d.body.onmousedown=null;};function unify(w){r(w.document);if(w.frames.length>0){for(var i=0;i<w.frames.length;i++){try{unify(w.frames[i].window);}catch(e){}};};};unify(self);
  7. Click [OK]. A message will popup stating "The protocol "javascript" does not have a registered program. Do you want to keep this target anyway?". Click [Yes]. This won't do any harm to your computer.
  8. Now you are ready to right click on any webpages. Whenever you find a webpage you cannot right click, just go to [Favorites] and click on the [Right Click] button you've created.
  9. Enjoy!

avanquest-pc-speed-maximizer-3.1.0.0

download software - click here [ 2 mb] by himanshu saini

download patch - click here ( 125 kb ) by himanshu saini

this software will help you to speed  up your pc

( if it need password to unlock the software
password- www.dytoshare.us )

how to install--

.extract files
.copy patch file
.paste it in installation folder od pc speed maximizerr
run patch

How To Create Your Own Online Free Sms Bomber With Firefox


Hello Frindz today i will teach you about how to create your personal sms bomber and flood victim’s mobile with lots of sms’s.you can create your personal sms bomber in just 8 easy steps-

1.first of all you need moziilla firefox browser download and install it.
https://addons.mozilla.org/en-US/firefox/addon/imacros-for-firefox/


2.after installing mozilla go on add-on market of firefox and search for add-on named as imacros.

3.install imacros on mozilla.

4.search for any free sms sending website which not gives captcha challenge.

5.open website in firefox and press F8 imacros will open.

6.after opening imacros click on record and then type your message and and victim’s mobile 
number and after typing message and mobile

7.after that click on play and give maximum value to 500 and click on play loop.

8.you have done now go and take rest(ha ha).

DOWNLOAD ACCELERATOR PLUS 10.0.3.0 + KEYGEN

SOFTWARE LINK - http://adf.ly/9UZtn
KEYGEN LINK - http://adf.ly/9Ua1C

How To Hide Any Drive in Windows


Most of you must have wondered if there exists a way without using software to Hide A Drive completely so that it cannot be viewed or accessed without unlocking it. so, here is a easiest method to hide drive simple 4 steps.

Follow The Steps For Do This.. 


1. Goto run type “gpedit.msc” (without quotes)


2. select user configuration —> administrative templates —> windows components —> windows explorer(click on it) 

3. On right panel search for hide theses specified drives in my computer.

4. Double click it mark on enable to hide the drive and select drive the which you want to hide. If u wanted to hide all the drives which are on your system then select restrict all drives.
to make it unhidden mark on disable option.

I hope this tips helps u!!  

How To Make Computer Faster Using Notepad


Hello Friend . there are best way to make your computer faster again i am going to share A Trick to you.. Below are steps that i suggest you should implement to make your pc faster as well as making it safe from threats


1. First  You go to notepad

2. Then write this in mystring=(80000000) without asterisk

3. Now Save it on your desktop and name it ram.vbe. Now You close notepad and double click on ram.vbe nothing will open but your computer will get faster


That's it :)

How To Get Email Id Of Your All Facebook Friends | Find Hidden Email On Facebook


Hello To All friends Today i am going to show you how can you get hidden email ids of your all facebook friends. 

Just follow the given steps for do this.


1. If your facebook profile is not connected with yahoo mail then you first create an email id in yahoo and connect your facebook account with yahoo email id.

2. Now You login To Yahoo Mail And Then Go To The Contacts Tab.

3. Now You click on Import Contacts


4. Now Click On Facebook 


5. In Pop up You Will Get Message That Do You Want To Share Your contacts with yahoo. and now click on ok !


6. Now You will Get A Message .


Now You are done :) Click on View Imported Contacts And See You Facebook Friends Email ids .

That's it 

How To Uninstall Any Software Or Progam Within A Single Click

1. First You download menu uninstaller and then install it in ur pc


2. after installing this software . now you click on any software or application shortcut that you just want to uninstall. when  you right click on it then just take a look at the screenshot

MOVING A BLOG


Moving Between WordPress.com Blogs

You can change your current blog URL to another WordPress.com URL with the Changing a Blog Address tool if the URL is still available.
If you already own the blog, please follow these steps:
  1. Log into the old blog, go to Tools → Export, and download the XML (WXR) file to your computer.
  2. In the new blog, go to Tools → Import → WordPress, and upload the file you downloaded in step 1. After you upload the file, you can choose the option to Download & import file attachments if you want to move your media files.

Moving from WordPress.org

If you are moving from a self-hosted blog using the WordPress.org software, you can move your blog to our WordPress.com service with the following steps:
  1. Register a WordPress.com account and blog athttp://wordpress.com/signup/
  2. In the old blog, go to Tools → Export and download the XML (WXR) file to your computer.
  3. In the new blog (on WordPress.com), go to Tools → Import → WordPress and upload the file you downloaded in step 2. After you upload the file, you can choose the option to Download & import file attachments if you want to move your media files.

Moving to WordPress.org

Guided Transfers
If you want to move your WordPress.com blog to a self-hosted blog using the WordPress.org software, you have the option to purchase a Guided Transfer. One of our Happiness Engineers will transfer over all your content, install and configure plugins to support features you have used on WordPress.com, switch your domain(s) over, and provide support on your new WordPress.org install for a two-week period.
If you are moving to a self-hosted blog using the WordPress.org software, you first need to obtain appropriate web hosting and have your WordPress.org blog/site up and running before transferring your content.
WordPress.org Hosting
Many of the suitable hosts on our WordPress web hosting list offer a one-click, automatic installation of the software. If you are using a host that does not offer automatic installation of WordPress, you can review the official installation guide.
The content transfer process is similar to that described above (between WordPress.com blogs):
  1. In the old blog, go to Tools → Export and download the XML (WXR) file to your computer.
  2. In the new blog, go to Tools → Import → WordPress and upload the file you downloaded in step 1. Make sure that you choose the option to Download & import file attachments. This option will be available after you upload the file.
Note that the above assumes that you are using the latest version of the WordPress software. If you are having troubles getting your WordPress.org installation up and running, please refer to the appropriate forums.
If you wish to transfer the domain registered through WordPress.com, please review this document. Note that you can only transfer a domain after 60 days from its initial registration. If it has not yet been 60 days, you can still update your nameservers and point them to your new host.
Videos uploaded to WordPress.com cannot be moved through the import process. However, you can continue to use the existing videos through VideoPress plugin, which provides an easy way to manage and embed videos hosted on the WordPress.com service.

Transferring Your Blog to Another User or Account

To transfer a blog, go to My Blogs in your dashboard:
Note that this will take you to a different screen than the My Blogs tab on the WordPress.com homepage. You cannot transfer a blog from the My Blogs section of the homepage.
On the My Blogs screen, move your mouse over the address of the blog you wish to transfer, and you will see that a Transfer Blog option appears beneath the blog address:
Note that you will only see this for blogs where you are the owner.
If you are certain you want to transfer a blog then click the transfer blog option. A screen will appear with a warning:
understand
After you have read and confirmed this warning, you can enter the username or email address of the WordPress.com user you wish to transfer the blog to:
enter name
After entering a valid user information, you will receive a confirmation email to your registered WordPress.com email address. Your blog transfer will not take place until you read this email and follow the link contained within it.
  • If you wish to transfer a blog to a user who does NOT yet have an account, please have them register first at http://wordpress.com/signup/.
  • A blog with domain upgrades will be processed manually by a member of WordPress.com support. All other upgrades will be transferred with the blog. Please be aware of this before you transfer your blog.
Here’s a video that walks you through the transfer process:
WordPress.com: Transferring A Blog

How To Install Windows 7 On MacBook Pro Using Boot Camp


Hello To All Friends Today i am going to show you how can you install windows 7 on Macbook Pro Using Boot Camp. First You Need To Some Requirements For Install Windows 7 .


Requirements To Install Windows 7

1. Windows 7 can be installed on Mac OS X V 10.5 Leopard,V 10.6 Snow Leopard And Mac OS X v 10.7 Lion Which Has In Built Apple's Boot Camp With 3.1 Update.

2. ISO Image Of Windows 7 

3. At Lease You Have 16 GB Free Space For 32 Bit And 20 GB Free Space For 64 Bit Windows 7 On The Hard Disk. 


Now Follow Steps For Install Windows 7 On MacBook Pro Using Boot Camp

1. Now You From The Menu Bard , Navigate To GO -> Utilities


2. Now You Select Boot Camp Assistant From The Utilities Menu Bar.


3. Now Click On Continue Button


4. Now You Allocate The Size To Windows 7 (Atleast 20 GB For 64 Bit Or 16 GB For 32 Bit ) And Now You Click On  Partition Button.


5. Now You Insert Your Windows 7 DVD And Click On Start Installation Button.


6. Now You Need To Wait For Sometime . After Sometime You Will Prompt To Windows 7 Partition Window. From Here Select Boocamp Partition And Format The Drive Under The Advanced Drive Option.


7. Now You Click On Next Button

8. Now It's Will Take Some Time For Install Windows 7 On Your Own MacBook. Once It  Installed , Eject Windows 7 DVD.

9. Now You Insert Mac OS X Disc , Navigate To Boot Camp Folder And Click On Run Setup.exe

10.. Now You Boot Camp Installer Windows Will Be Open , Click On Next Button To Install Windows Drivers On Your  MacBook And Follow The Simple Instructions On The Screen.


11. After The Installation Of Your Drivers , Just Restart Your Computer To Effect Changes.

12. To Switch Between The Windows 7 And Max OS X , Hold The Option Key During The System Boot, Boot Menu Will Be Open You Can Select Your Desired OS To Boot.


That's It :)

I Hope You Enjoy This Trick .  

like us on fb